Te Araroa Best Resupply Strategy
The Ultimate Te Araroa Food Resupply Strategy
I fielded many questions from curious family and onlookers when planning to walk New Zealand’s stunning 3,000km National Walking Trail, Te Araroa. On hearing of my extraordinary plans to walk the entire length of the country, one concerned youngster asked "but will you have to carry all your own food?" It’s a valid question which can be answered succinctly though not helpfully with a yes and a no.
It’s all in the interpretation of the word "all" and for that youngster, grasping how long it would take to walk Te Araroa’s three thousand kilometres was challenge enough. In an attempt to illustrate the timeframe, I’d explained that I’d start walking in the springtime and then would continue right through their Christmas holidays, before finally completing the long distance hike towards the end of summer.
Yes, I will have to carry all my own food when walking Te Araroa but no, I won’t be setting out from Cape Reinga headed for 90 Mile Beach with 350 meals plus endless snacks and drinks. If I did, I know what I’d be eating first and it wouldn’t be the potato mash!
-
Click on the items in the list below to jump directly to that paragraph.
-
The Ultimate Freewheeling Kiwi Te Araroa Food Resupply Strategy contains a wealth of information, some of which may be new to you.
If you’re planning to walk Te Araroa and want to get the most benefit from this article, use the Contents List above to quickly navigate your way between sections. Once you’ve opened the Contents List, click any of the bullet points to jump straight to that topic.
Throughout the article, I’ve linked to further reading, products, services and directly to the daily blog or vlog relevant to that paragraph.
Where it helps to add further context, I’ve included videos from the relevant day. As well, click any of the images as they will also take you directly to the relevant day.
Here is my Ultimate Guide to Te Araroa Food Resupply
Te Araroa Food Logistics
For those of you in the planning stages of your Te Araroa thru hike, the logistics may all feel a little overwhelming. They did to me and I spent many late nights figuring it all out for myself. Unlike my young friend, I’m sure you’ve already realised that you’ll be resupplying along the way. But what does that actually look like in practice?
This article covers everything you need to know to successfully resupplying on a long distance hike like Te Araroa as well as the common mistakes that many of us have made while gaining experience.
What Te Araroa Isn’t
Te Araroa is not a guided walk where someone else will be responsible for carrying your heavy pack and delivering it to your night's accommodation. Nor will you be met at your meal breaks by a support crew offering kind words of moral support and mouthwatering delights. There’ll be no one to fluff up your pillow at night, nor to turn down the sheets and leave a mint chocolate on the bedside table. If that’s what you’re after, you’d better stop reading now.
Food Glorious Food
Walking a long distance hike like Te Araroa is one of the few times in your life that you’ll get to eat whatever and as much as you want without fear of overeating.
Food will become the key topic of conversation at dinner times in the huts and campsites and something you’ll dream of during the day.
On approaching trail towns, you’ll perfect the art of reaching the supermarket ahead of your trail family just so you get first dibs on all the snacks.
Either that or be ready for the crushing disappointment that comes with reaching the chocolate stand only to find that the fruit and nut bars you’d been fantasising about are all gone. Trust me, there’s a lot to be said for hitching that last kilometre into town!


Refining Your Te Araroa Food Requirements
When Andrew and I left Cape Reinga on the very first day of our Te Araroa thru hike, our breakfasts consisted of an individual portion of oats (porridge) with a few nuts thrown on for good measure. By the time we finished at Stirling Point in Bluff we were respectively eating two portions of oats mixed with chia seeds, LSA, milk powder and a generous handful of nuts.
That’s the difference one hundred and thirty three days and three thousand kilometres makes to your body. Your appetite is going to increase dramatically while walking Te Araroa and for us, despite the increase in fat laden calories, we each lost over 10% body weight.
How you fuel your body on day one is going to be different to how you fuel it on day one hundred. Whether you’re in the mountains, on a beach or on the roads will also impact your appetite as will hiking, biking or canoeing sections of Te Araroa.
With an almost infinite range of variables, planning your Te Araroa food strategy can be an operational nightmare.
Keep It Super Simple (KISS)
Rather than becoming bogged down in the logistics, keep your Te Araroa food resupply strategy super simple.
As mentioned above I walked Te Araroa with my partner Andrew and like many couples, our food needs vary greatly. For one thing, our calorie intake is quite different, Andrew is a lot bigger than me so needs more fuelling. Like many men, he enjoys large meals at regular times whereas I, like many women, like to snack throughout the day.
Before leaving home, I prepared two hundred dehydrated meals for our resupply boxes (drop box) and packed each zip lock bag with a two person portion. In practice, as Andrew has the larger appetite, he gets the larger portion. The only thing I can match him on portion for portion are the snacks!
Just In Case
When on any overnight or multi day hike we make a habit of always carrying an extra day’s food just in case. It’s simply good practice as you don’t know what might happen.
When walking Te Araroa, there were several times that our extra food was worth it’s weight in gold. One particularly memorable time was when we were headed for the Waiau Pass in the Nelson Lakes section of the South Island.
The skies opened up and the rain thundered down making any forward progress perilous. We had an unplanned but not unanticipated extra night at the Blue Lake Hut before having to beat a hasty retreat back down the mountainside.
Read Next: Te Araroa Essential Thru Hiker Diet
Te Araroa Food Resupply Options
The main strategies for your food resupply on Te Araroa are:
There’s no right or wrong way to organise your food for your Te Araroa hike, just as there’s no right or wrong way to walk the trail. This is your time, your big adventure and you do what works for you. As the trail saying goes, hike your own hike.
Buy As You Go Strategy
While organising your Te Araroa food strategy, carrying everything will likely seem the obvious method though not how my young friend above visualised.
Buying as you go and carrying all the food you need for a particular section or trail allows you to make consistent progress each day. There’s no need to detour off trail to find shops (or a town) or to pick up your resupply box. When you do get to town, you’ll simply buy what you need for the next section.
It can be difficult at first to judge just how many day’s hike a section will take and how many day’s food to pack but the longer you’re on trail, the more skilled you become at evaluating your needs.
If you take less time than anticipated, it just means you’ve food for the next section. If it takes longer, it means you’ll be rationing your supplies and seriously, you might get a little hangry, but no one’s going to starve by arriving a day late in town.

Te Araroa: Supermarket Locations
The ultimate list of resupply supermarket locations for Te Araroa hikers. My comprehensive list includes every town that Te Araroa passes through so hikers can plan where to shop and resupply their food. The Freewheeling Kiwi Te Araroa Supermarket Locations list includes 90 individual supermarkets complete with their street address
Find out where to resupply when hiking Te Araroa. This comprehensive list covers the entire 3,000km Te Araroa from Cape Reinga to Bluff and includes every town that Te Araroa goes through.

Te Araroa Resupply, Whanganui, New Zealand
Your Pack and Food Weight
Neither Andrew or I are ultra-light hikers and no matter how I tried, my loaded pack averaged about fifteen kilograms including food and water. As it was a wet season, I never had to carry that much water, often times only one litre which is the equivalent of one kilo.
Heading into the longer sections of Te Araroa, such as Tararua Ranges, Richmond Ranges and Waiau Pass meant adding in a few more kilograms. With all that weight, there’s little wonder I had a good appetite!

Food Resupply, Te Araroa
We tried to keep our daily food weight limited to around half a kilo which meant on those longer eight or nine day sections of Te Araroa we’d be carrying at least four or five kilos just in food and just in case. The longer sections also mean you’ll need more fuel to cook your food - that is, unless you’re a cold soaker.
That’s quite a lot to squeeze into what appears to be an already full pack and by the way, my pack’s capacity was fifty litres. Somehow or other, we were always successful in squeezing all our food in which I recommend rather than have food (or anything) strapped to the outside of your pack ready to catch on tree branches and the like.
Create a Cache Strategy
Creating a cache or stashing food is a method for food resupply that is not generally used in New Zealand by hikers on Te Araroa. Caching means to store your food at pre designated points along the trail for you to then collect and use later as needed.
In theory, you’ll store your long life food in a sealed weather and animal proof container, deliver it to the site, attach it high up in a tree to prevent large animal interference and then access it later.
In practice, you’ll spend days driving around New Zealand’s Southern Alps to create your caches, then will have forgotten where you stashed it, didn’t I mention that you need to record your waypoint or at the least taken some photos of the location!
When you do locate your cache, you’ll discover that possums really can chew through plastic and that they’ve made a nice opening for the smaller rodents to get in and party.
Finally after you finish your walk, you’ll need to return once more to the location to collect the container.
Using this strategy is not terribly practical for Te Araroa and I’m not aware of anyone doing it. Caching may be a strategy that you use elsewhere or in conjunction with a friend who’s the time and desire to walk in off the road to leave a stash for you. Perhaps store the idea in the back of your mind for another trail.
Read Next: My Top 5 Te Araroa Mistakes
Te Araroa Resupply Box Strategy
A resupply box also known as a drop box is one that you send on to yourself at a prearranged location. It’s typically used in relation to food supplies but may also contain for example, prescription medicines, paper maps and other items not readily available at that location.
Stove fuel can not be sent by New Zealand post or courier therefore you’ll need to carry enough to keep you going until the next town.
Te Araroa Resupply Box versus Bounce Box
A bounce box is popular on some long distance hikes, particularly overseas. You’ll fill it with your sometimes-used necessities and then it can be repeatedly mailed ahead of you on the trail.
Typically a bounce box includes items that you’ll need periodically but don’t want or can’t carry. Hikers fill them with supplies such as extra batteries, phone chargers, town clothes and toiletries.
If using a bounce box, remember to include mail supplies such as sticky tape and a permanent marker within the box so that you can send it on again.
Before getting too excited about using a bounce box on Te Araroa, note that in practice, the success or otherwise of your plans relies on a efficient mail or courier system capable of delivering to rural New Zealand.
Realistically, you may "bounce" your box forwards, only to find when you reach the destination ten days later, your box is still missing in action.
Wheres with a resupply box, it’s only making one trip and yes, it still relies on that same mail or courier system however, if you’re organised, you can have it sent early enough so that it’s actually there when you arrive.
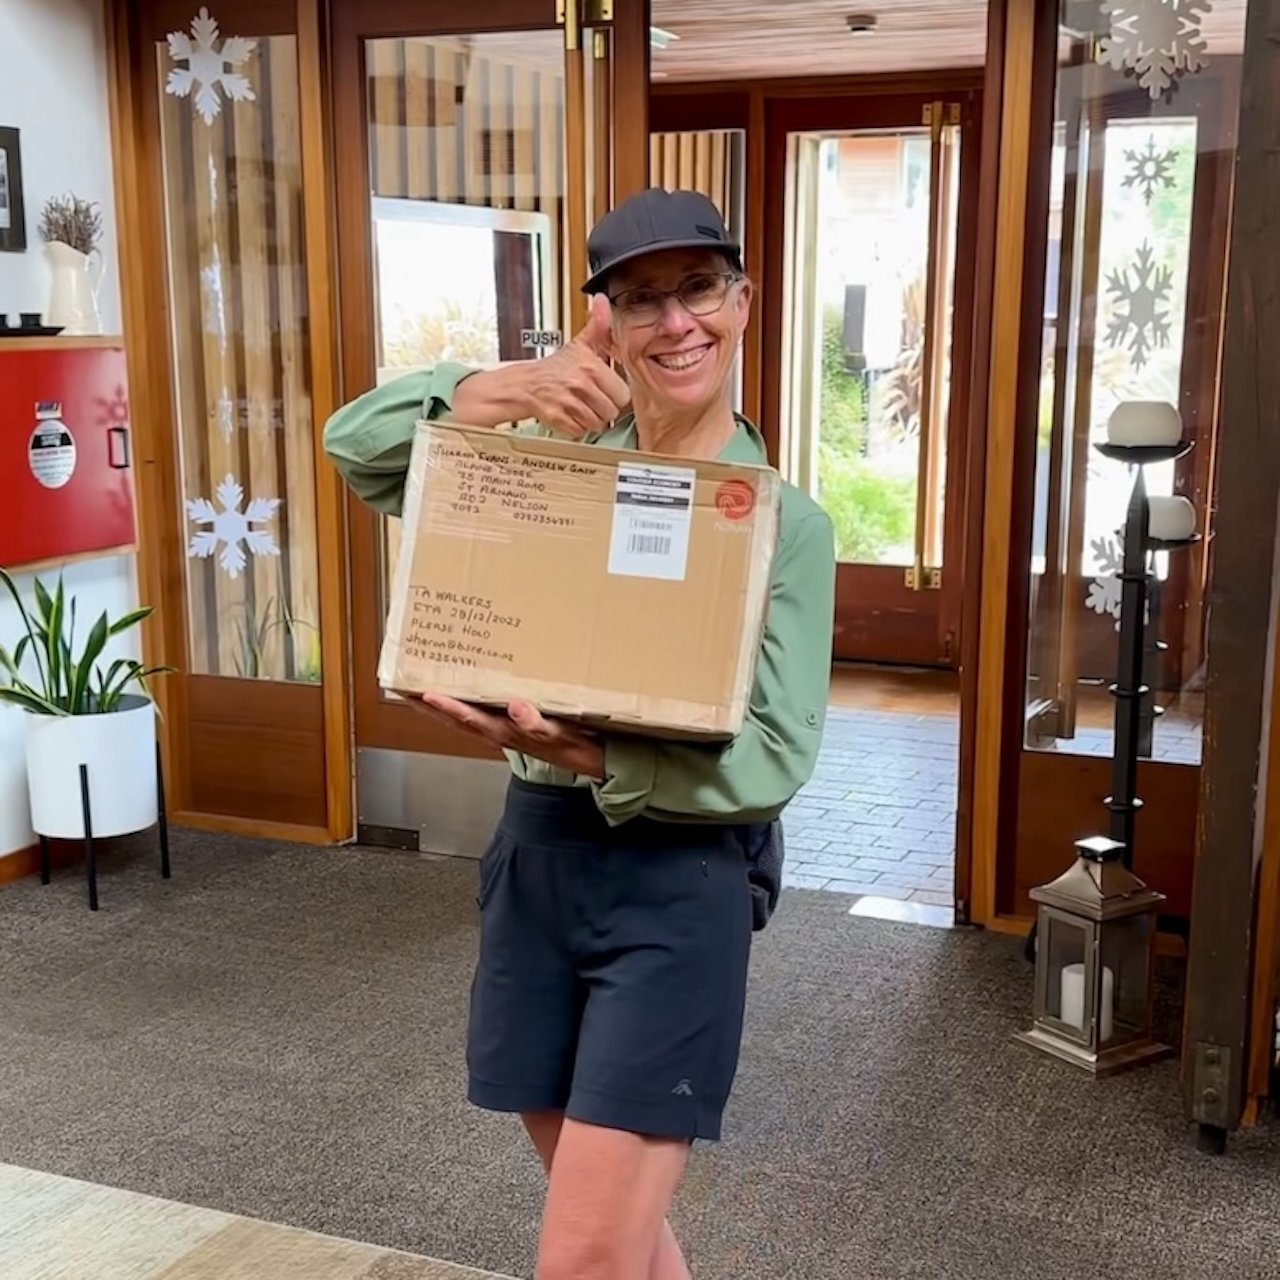
Te Araroa Resupply Box, Christmas Day, St Arnaud, Nelson Lakes
General Te Araroa Resupply Considerations
Te Araroa Organisation provide comprehensive trail notes and maps with information to help you plan your walk. Be sure to take a deep dive into this information as you’ll find it invaluable.
In the trail notes amongst descriptions of Te Araroa, it’s conditions, access and transport, there’s also details on accommodation and where to buy food and other supplies.
Post Shops (post offices) locations are limited to urban areas, check this locator to find your nearest one. They’re only guaranteed to be open Monday to Friday and hours may be limited. In tourist towns such as Wanaka and Queenstown, they may also be open on Saturday and Sundays to cater for the tourists.
Resupply points are generally further apart in the South Island and hikers are reliant on the kindness of trail angels and hiker friendly businesses to hold their parcels.
Consider your rubbish when packing your resupply box and exclude any surplus packaging on your food items, you know the type of things, sealed bags stored within sealed boxes. This will not only help to keep your parcel cost down but critically, reduces the rubbish at the pick up point.
The reason for sending the resupply box is because there’s limited services in the resupply location. This applies equally for the trail angel or hiker friendly business that’s agreed to accept your parcel. They certainly don’t need all your excess rubbish as there’s many rural locations in New Zealand that have very limited rubbish or recycle collections.
Make arrangements with the resupply location provider before sending your box and establish if they’ve any specific criteria. This might include details on their preferred pick up times, fees or if it’s expected you’ll use their services further as in staying at their campsite or hostel.
We sent a resupply box to St Arnaud which coincided with Christmas Day and quite understandably, the lodge where we’d sent it restricted pick up times on this important family day.
Bookmark the Te Araroa Daily Vlogs for later: Te Araroa Daily Vlogs
Clearly write the following details on the outside of your resupply box:
Please hold
Your name
Te Araroa walker
Your New Zealand phone number
Your email address
Estimated date of arrival (EDA)
Make plans as to what you’ll do if your resupply box hasn’t arrived. Will you abandon it and keep walking, is it possible for it to be sent on at your cost to your next location, will you arrange for the contents to be donated to those following behind? Communicate and agree those plans with the person who’s accepted your box.

Te Araroa Resupply Boxes
Read Next: Te Araroa Solo Woman Safety
Pros and Cons of Te Araroa Mail Drops
Are you a planner? I am and having a framework for my hikes gives me a sense of security.
When planning our Te Araroa journey, I created a detailed spreadsheet that included the daily and accumulative distances, resupply points, accommodation, notes, budget plus expected expenses and all sorts of useful links amongst other information.
Of course I knew once we were on the trail, that itinerary would be constantly adapted to the reality but I still liked to start out with a plan.
While I’m detail orientated you might not be, you may prefer to wing it, relying on the trail to provide for whatever you need. If the thought of pre planning your meals ahead of time bores you to tears, don’t do it.
What to Send in Your Te Araroa Resupply Box
Focus on lightweight, high-calorie, nutritionally rich foods that are easy to carry and store like freezedried or dehydrated food, drink mixes and items repackaged for better transport.
Focus on:
Freeze dried or dehydrated meals that are lightweight and nutritionally and calorie dense
Drink mixes that provide sustenance and hydration such as smoothies
High-calorie food such as nuts, seeds and dried fruit
Snacks that are calorie dense and easy to carry
Food items repackaged in ziplock bags to help consolidate the parcel and reduce waste
Small non glass containers for liquids like olive oil for extra calories

Te Araroa Resupply Food
What Not to Send in Your Te Araroa Resupply Box
It’s common sense to most of us but I still hear horror stories from trail angels who’ve had to deal with a stinking mushy resupply box that’s not been picked up.
Avoid sending items that are perishable, heavy, bulky or that require special handling, especially when you’ll need to carry it up and down the Southern Alps over the next week.
Leave out:
Heavy and bulky packaging like cans and glass bottles
Perishable items which will spoil before you get there - seriously, people are still putting cheese in their resupply box!
Low calorie, nutrient poor food
Foods that are overly packaged
Read Next: Te Araroa Gear List Essentials

Get Your Trail Ready Meals Now
When heading out on trail I always make sure to take my favourite trail food - especially for those extra big days!
Meals can be ordered online and then sent on directly to your resupply point saving you time and money.
Radix Nutrition meals are designed to provide the nutrients you need to perform and thrive.
Learn more here and use my code FREEWHEELINGKIWI15 for 15% off!
Resupply Checklist for Te Araroa

Putting Your Te Araroa Resupply Strategy Into Practice
Now that you’ve some ideas, I’ll share with you what our resupply practice was on Te Araroa
Freewheeling Kiwi Te Araroa Resupply Strategy
When we walked Te Araroa, we felt it necessary to send resupply boxes to Havelock, St Arnaud, Boyle Village and near Arthurs Pass as there are limited or no supplies in these areas. We also sent a couple of boxes elsewhere simply because we had friends in those areas and were trying to keep our costs down.
To put the South Island in perspective and assuming you are not leaving the trail after resupplying in Picton, you will not find either of the two major supermarket brands (Woolworths and New World), until more than 900 kilometres later when you reach Wanaka.
Sending yourself a resupply box is not mandatory and some hikers chose to resupply from what limited supplies are available in the smaller villages. This works well if you’re prepared to risk eating nutritionally poor food and so long as the Te Araroa bubble hasn’t already cleared the shelves.
By "bubble" I refer to the impact of the majority of South Bound walkers reaching the Richmond Ranges, Nelson Lakes and even Northern Canterbury sections as the North Bound walkers come from the opposite direction.
Added to this is Aotearoa New Zealand’s summer holidays when you’ll meet other hikers, particularly around the Nelson Lakes section, who’ve come out for a multi day walk. Hence the requirement to pre-book the Nelson Lakes huts.
Freewheeling Kiwi Te Araroa Resupply Itinerary
There are some sections of Te Araroa particularly in the South Island that are a very long way between towns and large grocery stores. The list below assumes you are able to carry seven days food and therefore only includes the sections which have more challenging resupply locations.
We felt it necessary to send resupply boxes to Havelock, St Arnaud, Boyle Village and Arthurs Pass.
North Island Te Araroa Resupply
On Trail - North Island
After leaving Dinsdale (781km) in Hamilton, your next town with one of the two major supermarket brands (Woolworths or New World) is Te Kuiti (890km).
Waitomo (875km) has a cafe with limited groceries.
At Taumarunui (1,052km) resupply for the 42nd Traverse and Tongariro Crossing Section as well as your Whanganui River Journey. Leave your river supply box with the company that you are hiring your canoe from. If you are not canoeing and are instead walking the Whakahoro to Whanganui section, make arrangements with the Canoe hire company so that you can collect your supply off them at Whakahoro. While in Taumarunui call in and see Rhys at Trunk Coffee House, tell him Sharon from Freewheeling Kiwi sent you.
Off Trail - North island
Detour into Levin from the Gladstone Road/Poads Road (1,561km) junction before continuing the next stage of the Tararua Ranges.
South Island Te Araroa Resupply
Assuming you are not leaving the trail and after resupplying in Picton, you will not find either of the two major supermarket brands (Woolworths and New World), until more than 900 kilometres later when you reach Wanaka (2,627km).
On Trail - South Island
There’s a Four Square at Havelock (1,816km) with good supplies.
Pelorous Bridge Campground (1,838km) may have snacks (ice creams/chocolate/chips)
St Arnaud (1,978km) has a combined service station/cafe/with very limited groceries. The DOC Centre in St Arnaud may have some dehydrated food for sale.
There’s a Four Square at Tekapo (2,430km) with good supplies
Off Trail - South Island
If you’re prepared to detour off trail, Hamner Springs or Westport can be reached from Boyle Village (2,097km) near the Lewis Pass.
Arthur’s Pass can be reached from near Greyness Shelter and Campsite (2213 km) though has only limited supplies. Alternatively, hitch to Christchurch or one of the closer country towns.
Methven is a logical detour and overnight stop when shuttling the sixty kilometres around the Rakaia River between Lake Coleridge (2,286km) and the Glenrock Track Trailhead (2,287km).
Between leaving the Movora Lakes and heading into Princhester (2,817km), hitch in to Te Anau for supplies.
At Birchwood (2,889km), head to Nightcaps for basic supplies.
Read Next: Te Araroa A to Z Guide
The Hybrid Strategy
As with most things in life, the best strategy may be to utilise a combination of buying food along the way and using resupply boxes for the more isolated places. This will give you the flexibility to buy as you go with the security and comfort of knowing there’ll be a supply box waiting for you at that more isolated spot.
The hybrid strategy also allows for changes in plans. For example, if you decide to do that side quest you can let your support team back at home know to send your box later or on to a different address.
What is Your Te Araroa Food Strategy
Food on a long distance hike is one of the most challenging things to plan for as it’s such a deeply personal choice.
I’ve shared several strategies within this article such as buying as you go and carrying everything, creating a cache or stash and sending resupply boxes to help you with your planning. In the end, Andrew and I used a hybrid strategy.
Do any of these ideas resonate with you or have you a whole different strategy? How are you going to manage your food resupply when hiking Te Araroa?
Share your thoughts and experiences in the comments box below, I’d love to hear your ideas.
Find More Te Araroa Resources Here!


Two years ago I walked the full length of Aotearoa, from Cape Reinga to Stirling Point in Bluff, covering more than 3,000 kilometres over 133 days.
What I expected was a physical challenge and a long-held adventure ticked off the list. What I did not expect was how profoundly the trail would reshape my understanding of rest, simplicity and coming back to myself.
The lessons did not arrive dramatically. They accumulated slowly, step by step, day by day, until something essential had quietly shifted.
Whether you are a long distance hiker or simply someone craving a proper reset, I think some of what Te Araroa taught me might resonate with you too.